> ## Documentation Index
> Fetch the complete documentation index at: https://geniex.aihub.qualcomm.com/llms.txt
> Use this file to discover all available pages before exploring further.
# FAQ
> Common questions about GenieX, its runtimes, and supported chipsets.
## **General**
A multi-platform AI inference SDK built for Qualcomm Snapdragon. GenieX runs frontier LLMs and VLMs on-device — Hexagon NPU, Adreno GPU, or CPU compute units — across Windows ARM64, Android, and Linux ARM64. See [What is GenieX](/en/get-started/what-is-geniex).
* **Trying things out, scripting** — [CLI](/en/run/cli/install) on Windows ARM64 or Linux ARM64.
* **Building an app** — [Local server](/en/run/cli/local-server) (OpenAI-compatible HTTP) or [Python SDK](/en/run/python/install).
* **Mobile** — [Android SDK](/en/run/android/install) (Kotlin, Maven Central).
* **Reproducible IoT deployment** — [Docker image](/en/run/cli/install) on Linux ARM64 EVKs, pinned to a release tag.
The [Quickstart](/en/get-started/quickstart) is a router into all four.
[Supported platforms](/en/get-started/platforms) — Snapdragon X on Windows ARM64, Snapdragon 8 Elite on Android, Dragonwing QCS9075 on Linux ARM64.
## **Runtimes**
* **llama.cpp** — runs any GGUF model, supports NPU/GPU/CPU compute units. Best for trying community models.
* **[Qualcomm® AI Engine Direct](https://www.qualcomm.com/developer/software/qualcomm-ai-engine-direct-sdk)** (`qairt`) — runs pre-compiled Qualcomm AI Hub Models, NPU only. Typically the fastest path when your model is on Qualcomm AI Hub.
See [Platforms & runtimes](/en/get-started/platforms#geniex-runtimes).
If you don't pass a compute unit:
* `llama_cpp` defaults to `hybrid` (HTP + CPU per-tensor scheduler — the fast path on Snapdragon).
* `qairt` defaults to `npu`.
Some models override this — e.g. `gpt-oss` falls back to `npu` on `llama_cpp`.
For llama.cpp on Snapdragon NPU: **`Q4_0`**. It has the best Hexagon NPU support. Qualcomm AI Hub Models are pre-quantized — no choice. See [Precisions (Quantizations) Supported](/en/models/supported#precisions-quantizations-supported).
## **Models**
Any **GGUF** model on the llama.cpp runtime. See [Run a GGUF model from Hugging Face](/en/models/supported#run-a-gguf-model-from-hugging-face).
Qualcomm AI Engine Direct requires a pre-compiled Qualcomm AI Hub Model — adding a new one means registering it on the C++ side first.
Some Hugging Face models require you to accept a license and authenticate. Set one of these environment variables:
* **Windows:** `$env:HF_TOKEN = "hf_..."` (or `$env:GENIEX_HFTOKEN = "hf_..."`)
* **Linux:** `export HF_TOKEN="hf_..."` (or `export GENIEX_HFTOKEN="hf_..."`)
Or run `huggingface-cli login` to persist the token to `~/.cache/huggingface/token`.
Priority: `GENIEX_HFTOKEN` > `HF_TOKEN` > token file. Get your token at [huggingface.co/settings/tokens](https://huggingface.co/settings/tokens). For full setup steps, see [Set up a Hugging Face token](/en/models/supported#set-up-a-hugging-face-token).
[Models](/en/models/supported) — split by runtime (Qualcomm AI Engine Direct, llama.cpp).
## **Chipsets & devices**
Yes. GenieX targets Qualcomm Snapdragon chipsets — Hexagon NPU, Adreno GPU, and Snapdragon ARM CPU compute units. There's no x86 or non-Snapdragon ARM build. If you don't have a device on hand, use [Qualcomm Developer Cloud / Device Cloud](/en/get-started/platforms).
No. Qualcomm AI Engine Direct is NPU-only by design. `cpu` and `gpu` aliases are coerced to NPU with a warning. Use the llama.cpp runtime (with a GGUF) if you need CPU/GPU fallback.
## **QDC (Qualcomm Device Cloud)**
No. Sign in to [Qualcomm Developer Cloud](https://qdc.qualcomm.com/), pick a Snapdragon device, and start an Interactive Session — that's the whole flow. See [Supported platforms](/en/get-started/platforms) for which chipsets are covered.
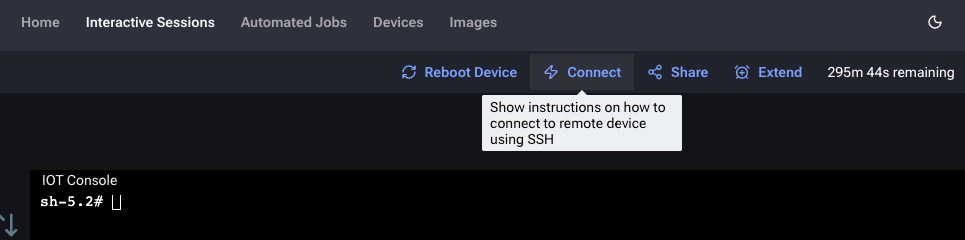
In the QDC portal, navigate to **Interactive Sessions** and click **Connect** to view the SSH connection instructions.
 Open a terminal and run the SSH tunnel command from QDC, replacing `` with your private key path.
 **`WARNING: UNPROTECTED PRIVATE KEY FILE!`** — your `.pem` file permissions are too open. SSH requires private keys to be readable only by the owner:
```bash theme={"dark"}
chmod 600 /path/to/your-key.pem
```
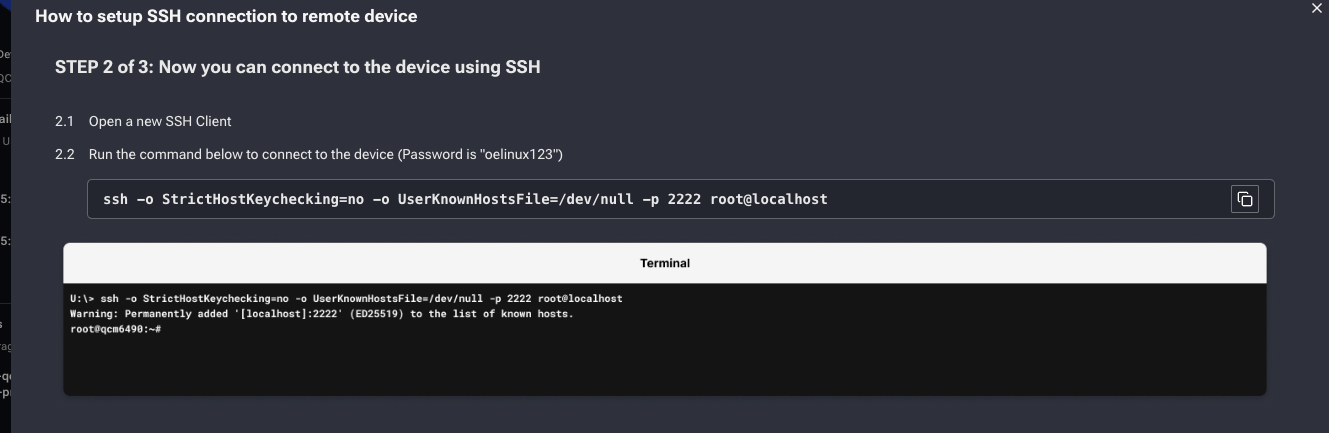
In a new terminal, SSH into the forwarded port. The default password is `oelinux123`:
```bash theme={"dark"}
ssh -o StrictHostKeychecking=no -o UserKnownHostsFile=/dev/null -p 2222 root@localhost
```
**`WARNING: UNPROTECTED PRIVATE KEY FILE!`** — your `.pem` file permissions are too open. SSH requires private keys to be readable only by the owner:
```bash theme={"dark"}
chmod 600 /path/to/your-key.pem
```
In a new terminal, SSH into the forwarded port. The default password is `oelinux123`:
```bash theme={"dark"}
ssh -o StrictHostKeychecking=no -o UserKnownHostsFile=/dev/null -p 2222 root@localhost
```
 Use a **Snapdragon 8 Elite** or **8 Elite Gen 5** Interactive Session on QDC and install the demo APK you build from source.
Build the sample app from [`qualcomm/ai-hub-apps`](https://github.com/qualcomm/ai-hub-apps/blob/release/geniex_chat_android/README.md) in Android Studio (**Build → Build APK(s)**) to produce a `.apk`.
Sign in to [Qualcomm Device Cloud](https://qdc.qualcomm.com/), choose **Snapdragon 8 Elite** or **Snapdragon 8 Elite Gen 5**, and select **Interactive session**.
Enable **Wi-Fi** (so the demo can download models) and **Keep screen on** (so the screen doesn't lock mid-download). SSH is **not** required.
Use **Upload file** in the session setup page to push your built `.apk` onto the device — the file must be uploaded **before** the session begins.
Start the session. In the mirrored screen, tap the uploaded APK to install, then open **GenieX Demo** from the app drawer.
Upload a test image via the QDC terminal:
```bash theme={"dark"}
curl -L "https://s7d1.scene7.com/is/image/dmqualcommprod/Qualcomm_AIHub_image2-1?$QC_Responsive$&fmt=png-alpha" -o /data/local/tmp/qualcomm.png
cp /data/local/tmp/qualcomm.png /sdcard/Download/
```
The image will appear in the app's image picker.
## **Python**
GenieX requires **ARM64** Python. x86\_64 / AMD64 builds are not supported, even under emulation.
QDC devices (Qualcomm embedded Linux / Yocto) ship with ARM64 Python pre-installed — verify with `python3 --version`. If your device does not have Python, use one of the methods below.
**Option 1 — [Miniconda](https://docs.anaconda.com/miniconda/) (recommended; works on Yocto and Ubuntu ARM64)**
```bash theme={"dark"}
wget https://repo.anaconda.com/miniconda/Miniconda3-latest-Linux-aarch64.sh
# CONDA_OVERRIDE_GLIBC: Yocto images often ship without `ldd`, which makes the
# installer's glibc probe fail with "Installer requires GLIBC >=2.28, but system has .".
# The override skips the probe; the real glibc on Qualcomm Linux 1.7+ is already 2.39.
CONDA_OVERRIDE_GLIBC=2.39 bash Miniconda3-latest-Linux-aarch64.sh -b -p $HOME/miniconda
eval "$($HOME/miniconda/bin/conda shell.bash hook)"
# Newer conda releases require explicit ToS acceptance for the default channels
# in non-interactive mode; without these, `conda create` errors out.
conda tos accept --override-channels --channel https://repo.anaconda.com/pkgs/main
conda tos accept --override-channels --channel https://repo.anaconda.com/pkgs/r
conda create -n geniex python=3.13 -y
conda activate geniex
python --version
```
**Option 2 — apt (Ubuntu ARM64 only)**
```bash theme={"dark"}
sudo apt update && sudo apt install -y python3 python3-pip python3-venv
python3 --version
```
QDC Yocto images do not ship `apt` — use Miniconda above.
No. There is currently no native Windows ARM64 Miniconda installer. On Windows ARM64, download the official [Python 3.13.3 ARM64 installer](https://www.python.org/ftp/python/3.13.3/python-3.13.3-arm64.exe) from python.org — see [Python Install](/en/run/python/install). Do not install the x86 / AMD64 build: GenieX wheels only target ARM64.
## **Server / API**
Yes — see [Local server](/en/run/cli/local-server). You can point the official `openai` Python client at `http://127.0.0.1:18181/v1` and reuse OpenAI code unchanged.
No. Pull models with `geniex pull` before starting the server.
Use a **Snapdragon 8 Elite** or **8 Elite Gen 5** Interactive Session on QDC and install the demo APK you build from source.
Build the sample app from [`qualcomm/ai-hub-apps`](https://github.com/qualcomm/ai-hub-apps/blob/release/geniex_chat_android/README.md) in Android Studio (**Build → Build APK(s)**) to produce a `.apk`.
Sign in to [Qualcomm Device Cloud](https://qdc.qualcomm.com/), choose **Snapdragon 8 Elite** or **Snapdragon 8 Elite Gen 5**, and select **Interactive session**.
Enable **Wi-Fi** (so the demo can download models) and **Keep screen on** (so the screen doesn't lock mid-download). SSH is **not** required.
Use **Upload file** in the session setup page to push your built `.apk` onto the device — the file must be uploaded **before** the session begins.
Start the session. In the mirrored screen, tap the uploaded APK to install, then open **GenieX Demo** from the app drawer.
Upload a test image via the QDC terminal:
```bash theme={"dark"}
curl -L "https://s7d1.scene7.com/is/image/dmqualcommprod/Qualcomm_AIHub_image2-1?$QC_Responsive$&fmt=png-alpha" -o /data/local/tmp/qualcomm.png
cp /data/local/tmp/qualcomm.png /sdcard/Download/
```
The image will appear in the app's image picker.
## **Python**
GenieX requires **ARM64** Python. x86\_64 / AMD64 builds are not supported, even under emulation.
QDC devices (Qualcomm embedded Linux / Yocto) ship with ARM64 Python pre-installed — verify with `python3 --version`. If your device does not have Python, use one of the methods below.
**Option 1 — [Miniconda](https://docs.anaconda.com/miniconda/) (recommended; works on Yocto and Ubuntu ARM64)**
```bash theme={"dark"}
wget https://repo.anaconda.com/miniconda/Miniconda3-latest-Linux-aarch64.sh
# CONDA_OVERRIDE_GLIBC: Yocto images often ship without `ldd`, which makes the
# installer's glibc probe fail with "Installer requires GLIBC >=2.28, but system has .".
# The override skips the probe; the real glibc on Qualcomm Linux 1.7+ is already 2.39.
CONDA_OVERRIDE_GLIBC=2.39 bash Miniconda3-latest-Linux-aarch64.sh -b -p $HOME/miniconda
eval "$($HOME/miniconda/bin/conda shell.bash hook)"
# Newer conda releases require explicit ToS acceptance for the default channels
# in non-interactive mode; without these, `conda create` errors out.
conda tos accept --override-channels --channel https://repo.anaconda.com/pkgs/main
conda tos accept --override-channels --channel https://repo.anaconda.com/pkgs/r
conda create -n geniex python=3.13 -y
conda activate geniex
python --version
```
**Option 2 — apt (Ubuntu ARM64 only)**
```bash theme={"dark"}
sudo apt update && sudo apt install -y python3 python3-pip python3-venv
python3 --version
```
QDC Yocto images do not ship `apt` — use Miniconda above.
No. There is currently no native Windows ARM64 Miniconda installer. On Windows ARM64, download the official [Python 3.13.3 ARM64 installer](https://www.python.org/ftp/python/3.13.3/python-3.13.3-arm64.exe) from python.org — see [Python Install](/en/run/python/install). Do not install the x86 / AMD64 build: GenieX wheels only target ARM64.
## **Server / API**
Yes — see [Local server](/en/run/cli/local-server). You can point the official `openai` Python client at `http://127.0.0.1:18181/v1` and reuse OpenAI code unchanged.
No. Pull models with `geniex pull` before starting the server.